
Production engineers, supervisors, operators, QA/QC personnel, maintenance teams, fabricators, safety personnel, procurement staff and technical sales personnel
Practical distinctions between grinding, sanding, finishing, polishing, buffing and lapping, with selection and process-control guidance for industrial metalwork.
Polishing refines an already controlled surface. It cannot reliably conceal unresolved geometry, deep scratches, contamination or heat damage.
This chapter is an educational and application-selection guide. It establishes a consistent working vocabulary for the handbook and explains how successive abrasive stages create the intended appearance or functional surface.
Inspect the machine, guard, spindle, wheel, pad, belt, attachment and work support before use. Confirm that every rotating accessory is intended for the machine and task; never exceed its marked limit. Secure the work and keep hands, clothing, hair, jewellery, gloves and loose materials clear of rotating parts and nip points. Control heat, sparks and ignition sources; isolate energy before changing, cleaning, clearing or inspecting equipment. Follow current Malaysian workplace requirements, site procedures, machine instructions and abrasive-product safety information. [S152; S153; S155]
Chapter objectives
After this chapter, the reader should be able to:
- distinguish grinding, sanding, finishing, polishing, buffing and lapping by purpose and abrasive action;
- decide whether the required result is geometric, visual, tactile or functional;
- plan a progressive scratch-refinement route;
- select a suitable abrasive form and contact support for the surface geometry;
- control contamination, heat, edge loss and compound carry-over;
- inspect a polished surface under repeatable conditions; and
- troubleshoot common polishing defects.
Use process names by purpose, not by appearance
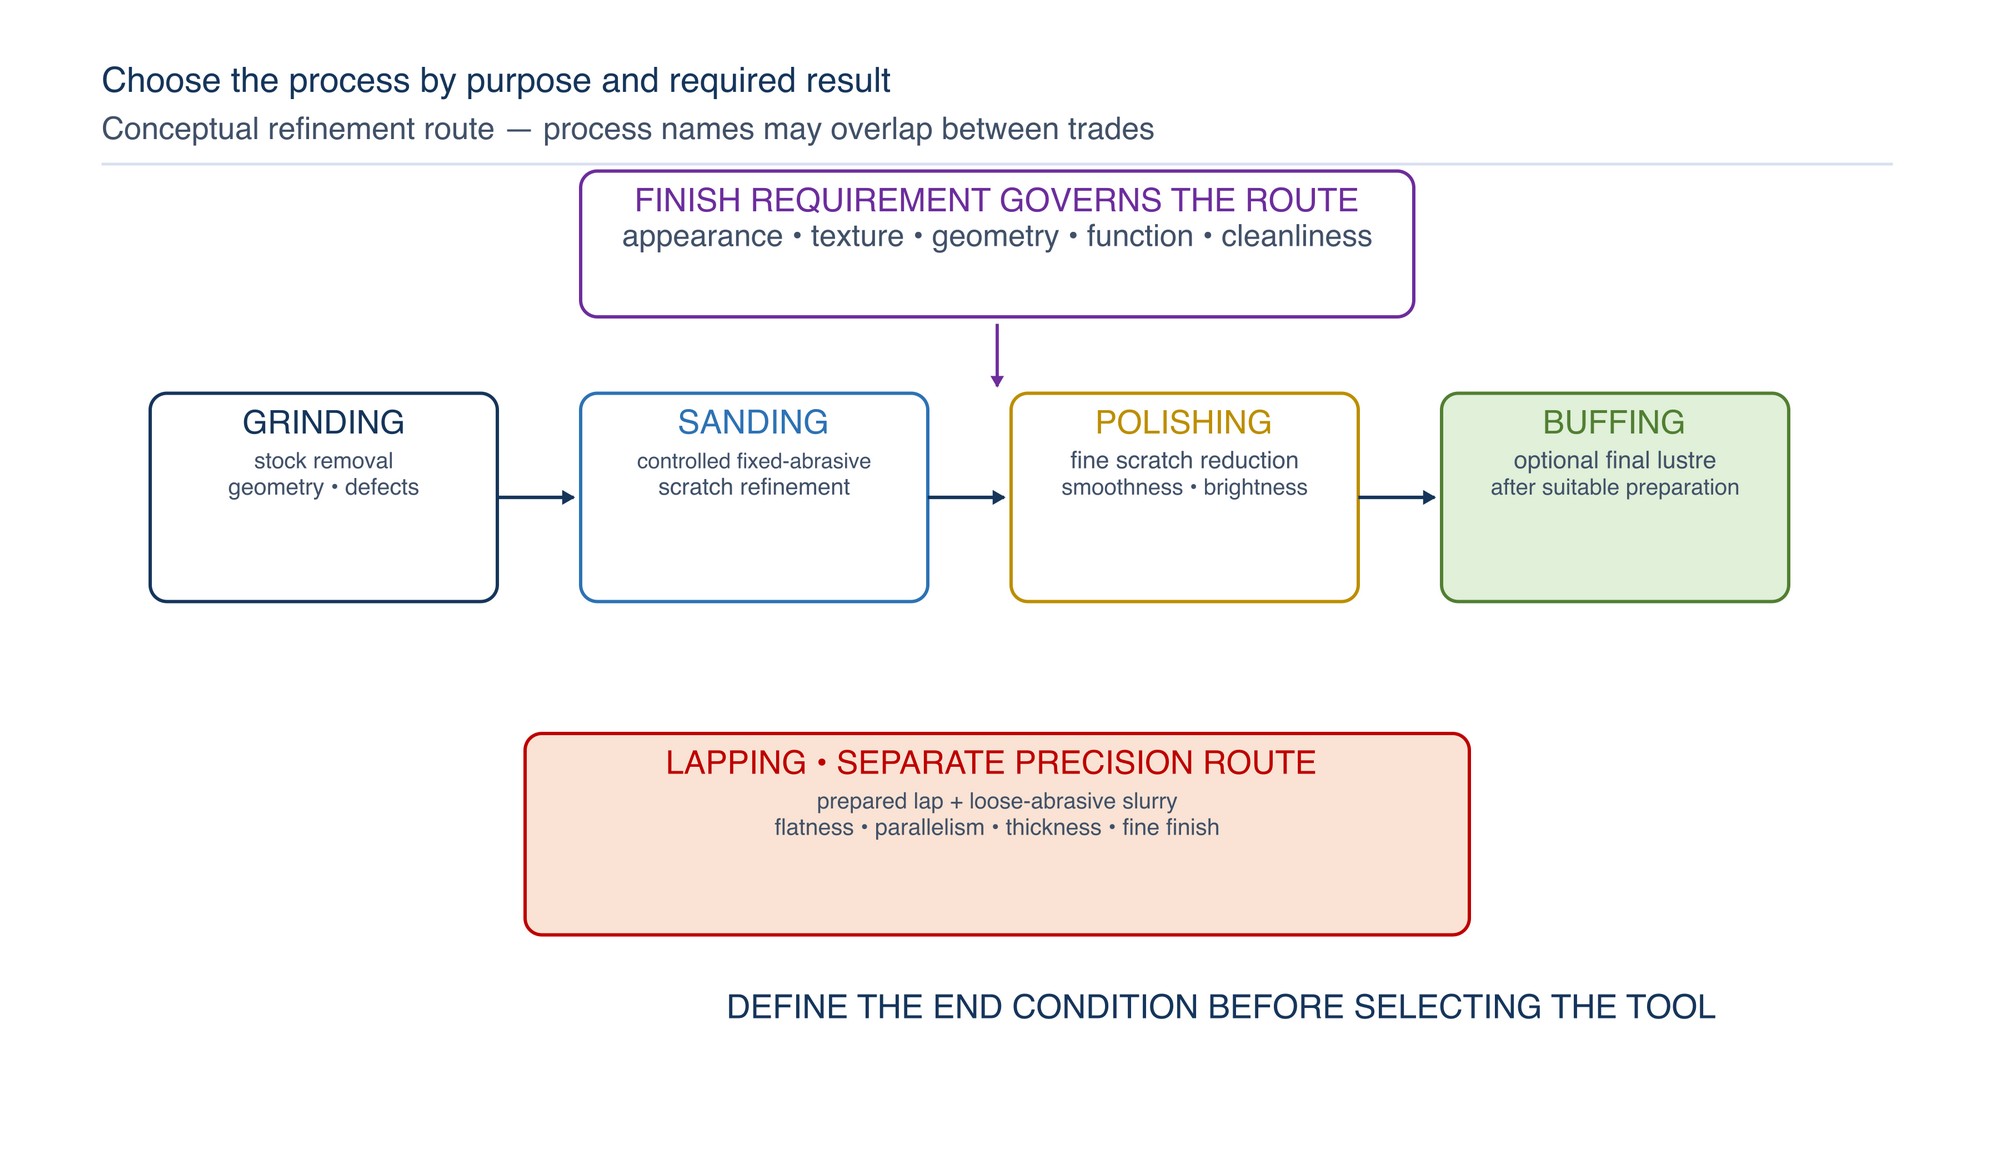
Industrial terminology varies between metalworking, coating, automotive, toolmaking and precision-finishing trades. A flexible abrasive belt may be described as grinding in one plant and sanding in another; a cloth wheel may be called a polishing or buffing wheel. For this handbook, the process name follows the primary purpose, the abrasive system and the way the surface is controlled. [S148; S150; S151; S152]
| Process | Primary purpose | Typical abrasive action | Usual result and control focus |
|---|---|---|---|
| Grinding | Remove stock, weld reinforcement, scale or defects; establish geometry | Bonded, coated or engineered abrasive cuts with comparatively high local removal | Shape, level, access and damage control come before appearance |
| Sanding | Remove the previous pattern and prepare for finishing or coating | Refine a surface with coated abrasive sheets, discs or belts | Fixed abrasive grains create a controlled scratch pattern |
| Finishing | Umbrella term for producing a specified surface condition | May include abrasive, brushing, polishing, chemical or other methods | Defined appearance, texture, cleanliness or functional condition |
| Polishing | Progressively reduce and regularise fine scratches | Fine fixed or loose abrasive acts through a supported tool, pad or cloth | Smoother, brighter or more reflective surface with controlled geometry |
| Buffing | Develop lustre and smooth very fine surface features after suitable preparation | Flexible wheel or mop, commonly with compound; relatively low intentional stock removal | Brightness, uniformity, cleanliness and avoidance of waves or drag marks |
| Lapping | Produce controlled precision geometry and fine finish | Loose abrasive slurry moves between the work and a prepared lap | Flatness, parallelism, thickness or finish verified by a specified method |
The boundaries are practical rather than universal. Name the required result and process stage as well as the tool. A request for “mirror polish” is incomplete until substrate, geometry, directionality, defect limits, cleanliness and inspection conditions are defined.
Grinding establishes; polishing reveals
Grinding is the appropriate starting process when the work still contains weld excess, heavy scale, casting skin, deep damage or substantial shape correction. It should leave enough material and a sufficiently uniform surface for the next stage without overheating, undercutting, gouging or rounding critical features.
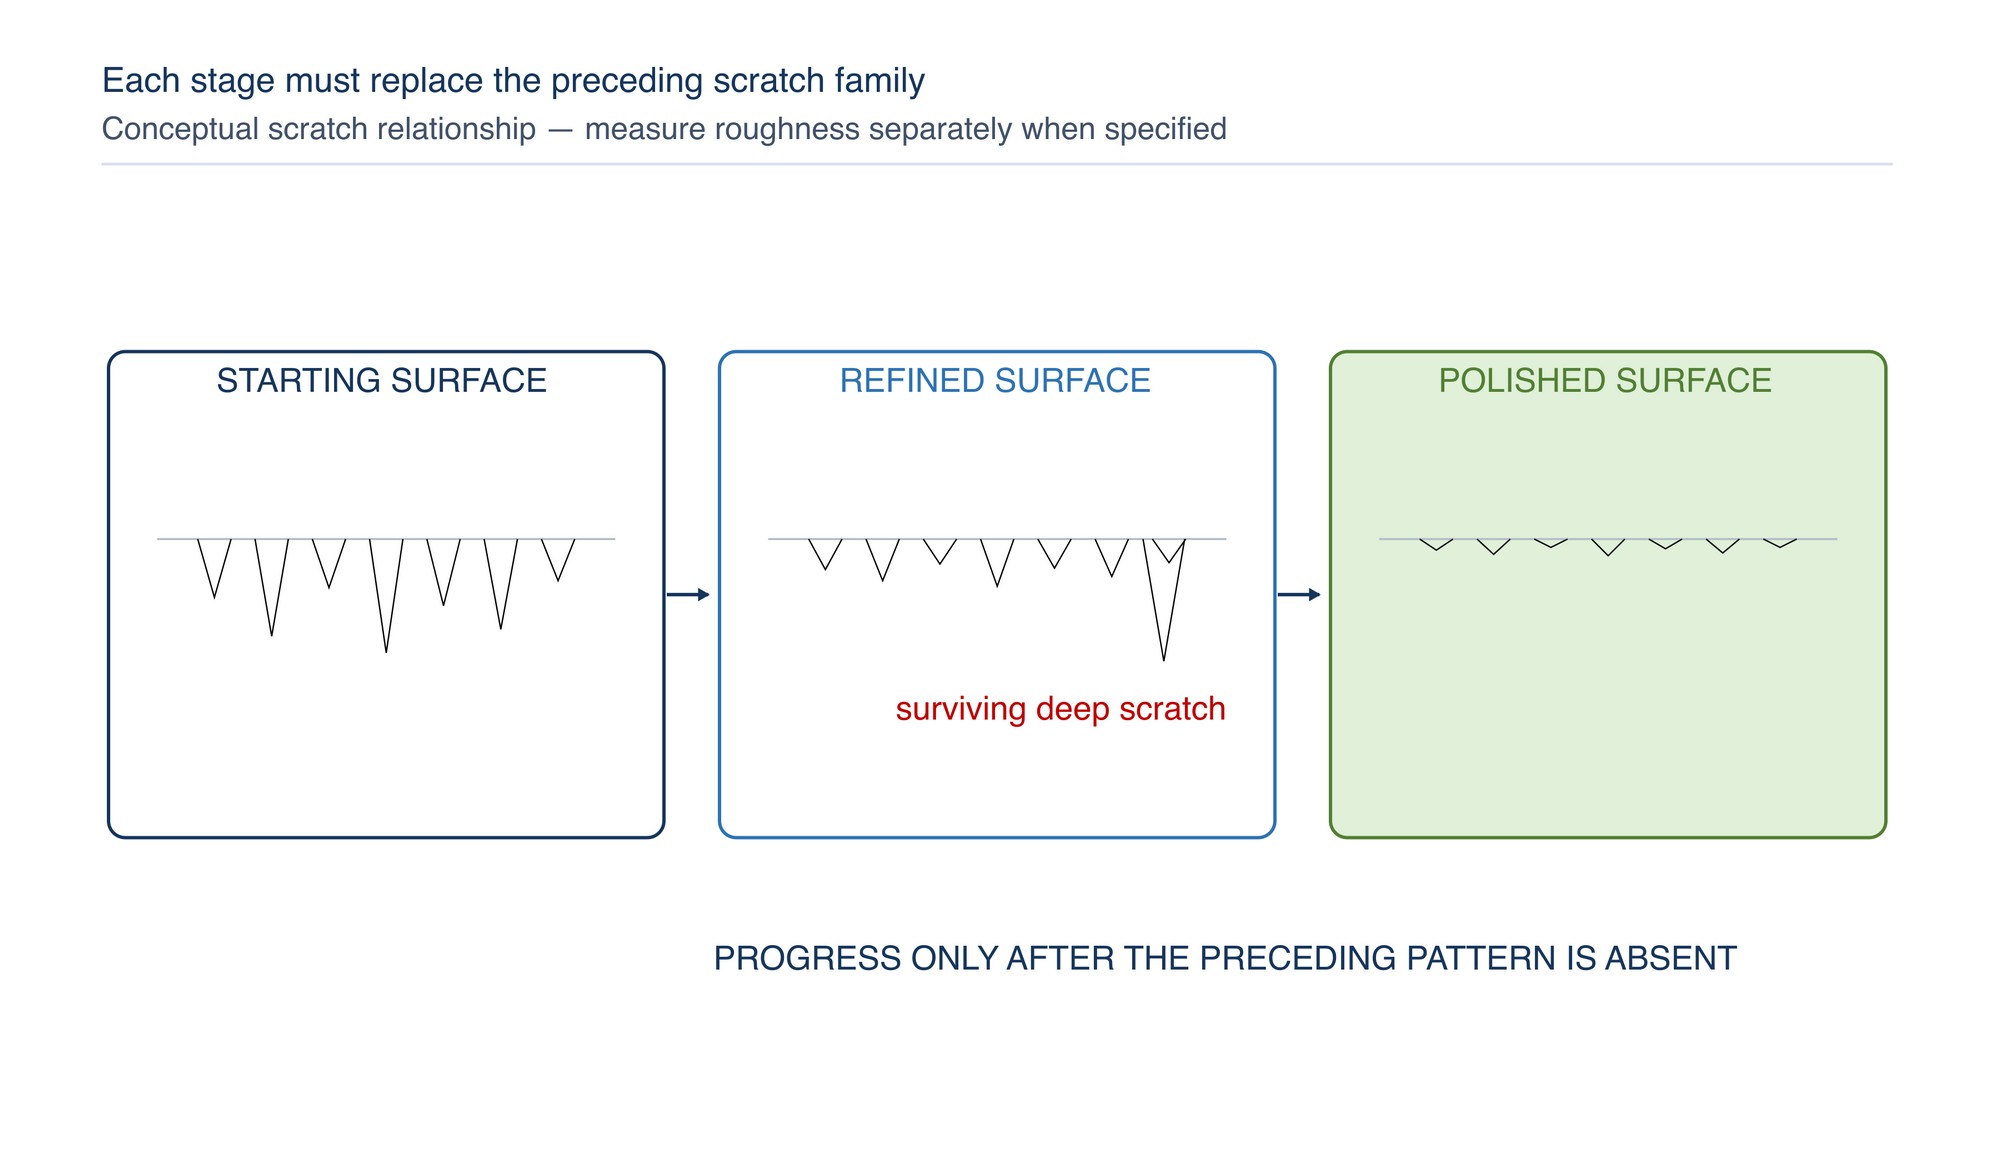
Polishing removes far less material per stage and therefore tends to reveal rather than erase earlier errors. A deep grinding groove that survives the first refinement stage will remain visible after the surrounding surface becomes bright. Trying to remove it with an overly fine product usually increases time, heat and edge loss.
Use the coarsest stage only as coarse as the defect and geometry require. Move to refinement when the required shape is established and the remaining scratch pattern is uniform.
Sanding creates the controlled bridge
Sanding normally uses coated abrasive sheets, discs or belts to replace the grinding pattern with finer, more regular scratches. Its role is to bridge stock-removal work and the final finishing or polishing stages. The backing and contact support are as important as the abrasive grade: a firm support preserves flatness, while a more conformable support follows curves but can soften edges or amplify waves.
At every stage, remove the deepest scratches left by the previous stage rather than polishing only the surface peaks. Clean the work, tool and surrounding area before changing to a finer abrasive. Large particles carried forward can introduce isolated scratches that are deeper than the new stage can efficiently remove. Struers specifically emphasises successive finer removal and cleaning between preparation steps. [S123; S148]
Finishing is the required end condition
“Finishing” is the broadest term in this chapter. It can describe a directional grain, satin appearance, coating key, deburred edge, low-friction contact area, hygienic surface or decorative sheen. Polishing is therefore one finishing route, not a synonym for every finished surface.
Define the end condition in observable or measurable terms appropriate to the part:
- appearance — gloss, reflectivity, colour, directional lay and acceptable local marks;
- geometry — flatness, edge form, blend boundary and absence of waves;
- texture — specified roughness or texture parameter and measurement method;
- function — cleanability, sealing, friction, coating adhesion or product-contact duty; and
- cleanliness — absence of compound, debris, oil, embedded particles or cross-contamination.
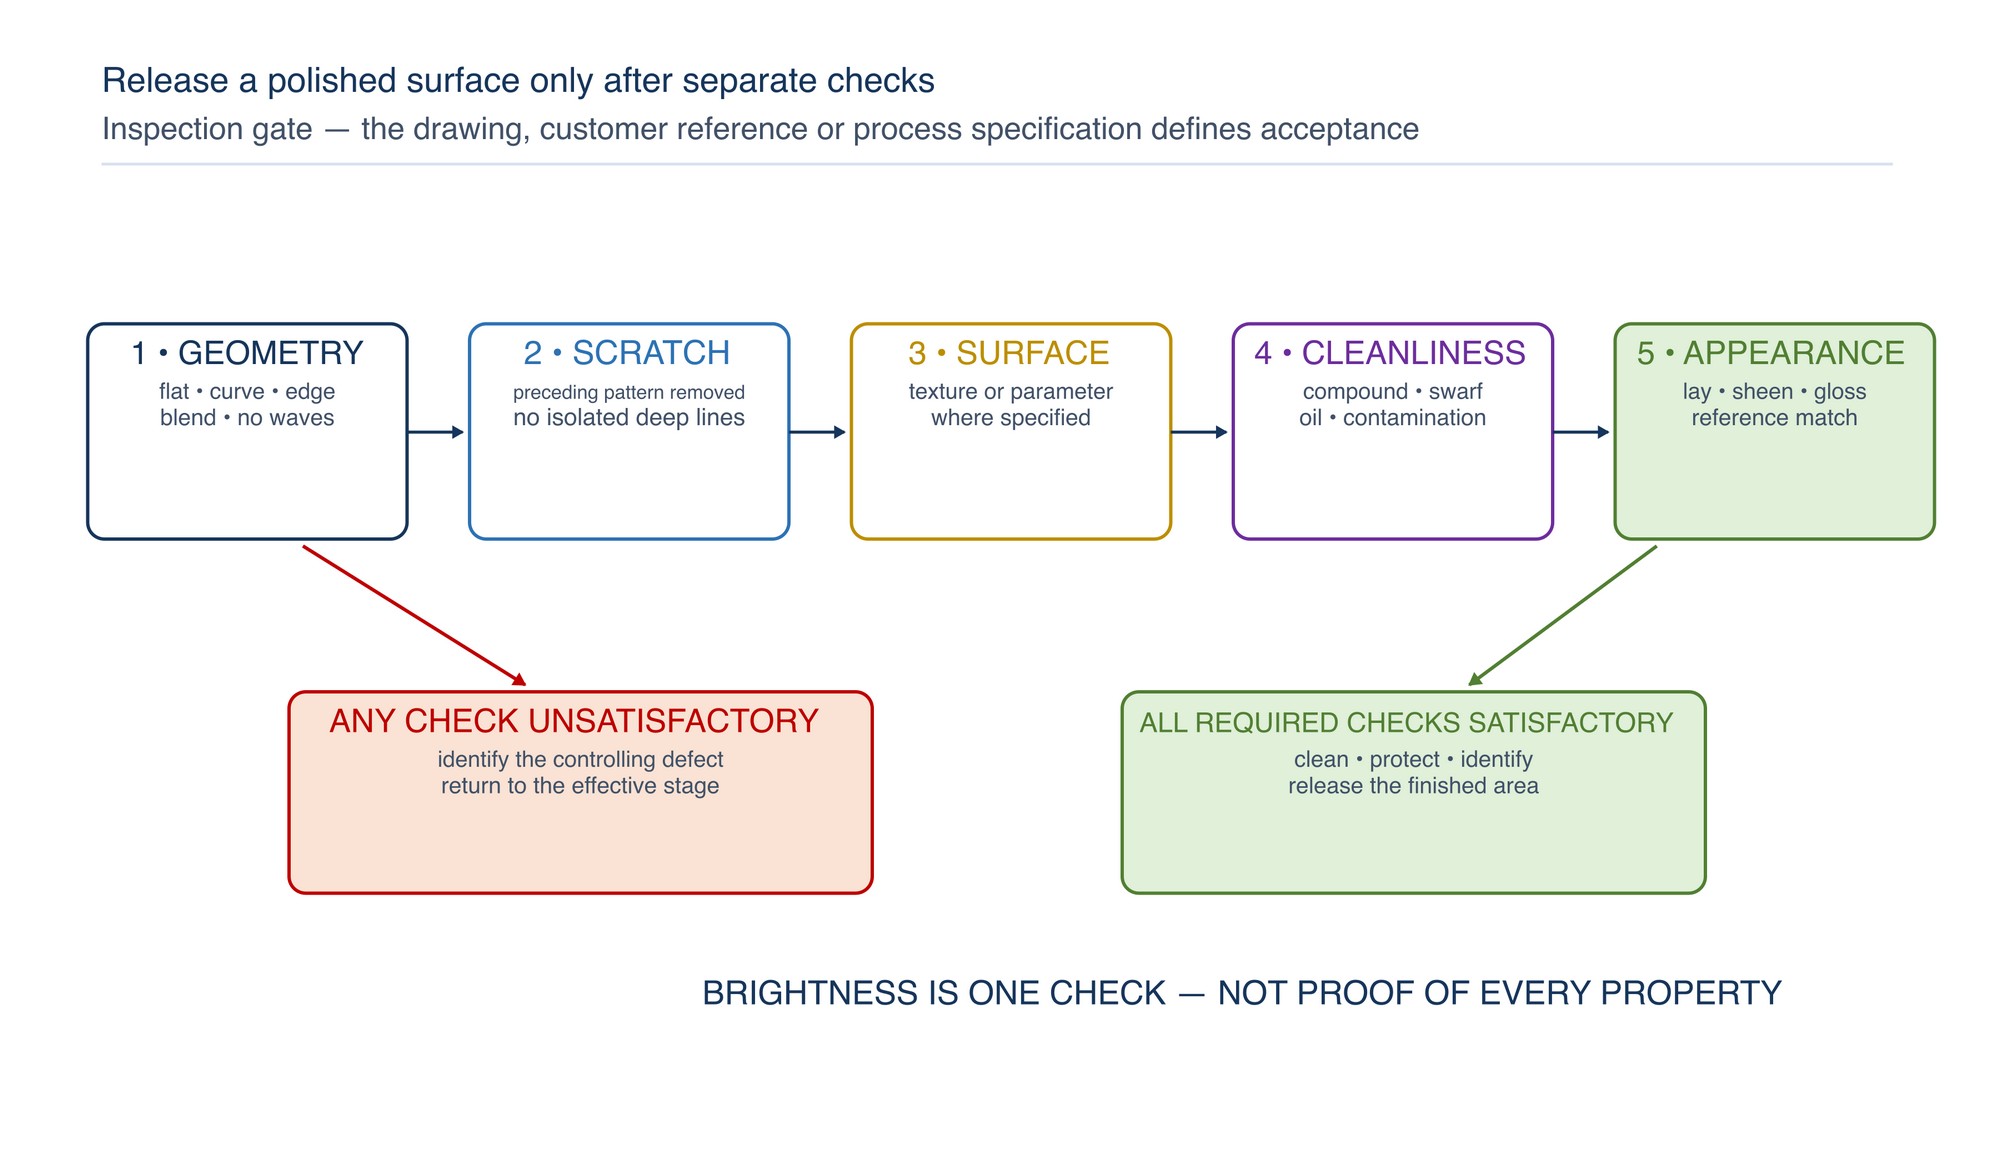
A polished appearance does not by itself prove surface roughness, hygiene, passivation, coating readiness or corrosion performance. Inspect each required property separately. [S114; S120; S151]
Polishing is progressive scratch replacement
Mechanical polishing uses progressively finer abrasive action to reduce the depth and visibility of the preceding scratch pattern. The result depends on the starting surface, abrasive type and condition, carrier or backing, contact support, motion, pressure, time, temperature, cleanliness and material response. [S023; S060; S148; S149]
Each stage must perform two jobs:
- remove the damage and deepest scratches from the previous stage; and
- leave a uniform pattern that the next stage can remove economically.
Skipping a stage can be successful only when the next product has enough cutting ability and the earlier pattern is already controlled. A finer label does not guarantee that capability, and nominal grades from different abrasive systems are not automatically equivalent.
Buffing develops lustre after preparation
Buffing commonly uses a flexible textile or felt wheel or mop, often with a fine compound, to smooth very fine surface features and increase brightness. Worldstainless distinguishes buffing from grinding and polishing by its emphasis on smoothing and reflectivity rather than deliberate bulk removal, while noting that the pre-buff finish strongly influences the result. [S151]
Buffing is not a substitute for complete scratch refinement. Excessive buffing on an inadequately prepared surface can produce a shiny surface that still shows lines, ripples, edge rounding or smeared metal. Compound can also lodge in seams, pores and recesses, so cleaning compatibility must be considered before painting, plating, welding, bonding or product-contact service. [S151; S154]
For exact compound, wheel, attachment and machine compatibility, Refer to the product label, Technical Data Sheet, or MKTECH representative.
Lapping is a separate precision process
Lapping uses loose abrasive in a liquid carrier between the workpiece and a prepared lap. The grains roll and slide within the interface while material is removed. It is selected where controlled flatness, parallelism, thickness or fine finish is central to the requirement. [S150]
Unlike freehand polishing, lapping performance depends on the condition and geometry of the lap, slurry delivery, workpiece arrangement and a controlled measurement system. A bright lapped surface is not accepted by appearance alone. Conversely, a polished decorative surface does not imply lapped flatness or dimensional accuracy.
Keep lapping slurry, equipment and cleaning routes segregated where abrasive carry-over could damage precision work.
Select the route from the required result
Start with the defect and end condition, then select the least aggressive route capable of reaching them while protecting geometry.
| Starting condition and objective | Appropriate starting family | Progression logic | Main verification |
|---|---|---|---|
| Weld excess, deep damage or major level correction | Grinding | Establish geometry, then remove the grinding pattern through controlled sanding | Shape, blend and absence of deep residual grooves |
| Uniform machined or previously ground surface requiring refinement | Sanding or fine grinding | Use successive stages until the pattern is suitable for finishing or polishing | Complete removal of the preceding pattern |
| Directional satin or brushed appearance | Finishing abrasive or non-woven system | Preserve lay direction and match the approved visual reference | Direction, sheen, blend and local defects |
| Bright or reflective appearance | Fine sanding or polishing, followed by buffing when appropriate | Refine scratches before developing final lustre | Scratch visibility under controlled lighting and viewing |
| Precision flatness, parallelism or thickness with fine finish | Lapping | Use a controlled lap, slurry and measurement plan | Specified geometry and surface measurement |
| Surface for coating, bonding, hygiene or corrosion service | Application-specific preparation | The governing process or service requirement | Prioritise cleanliness, texture and compatibility rather than gloss alone |
Where a drawing or customer specification calls for an exact finish designation, parameter or appearance, use its stated method and revision. Do not convert a visual description into a roughness value, or a roughness value into a guaranteed appearance, without a validated correlation for that process.
Control the polishing interface
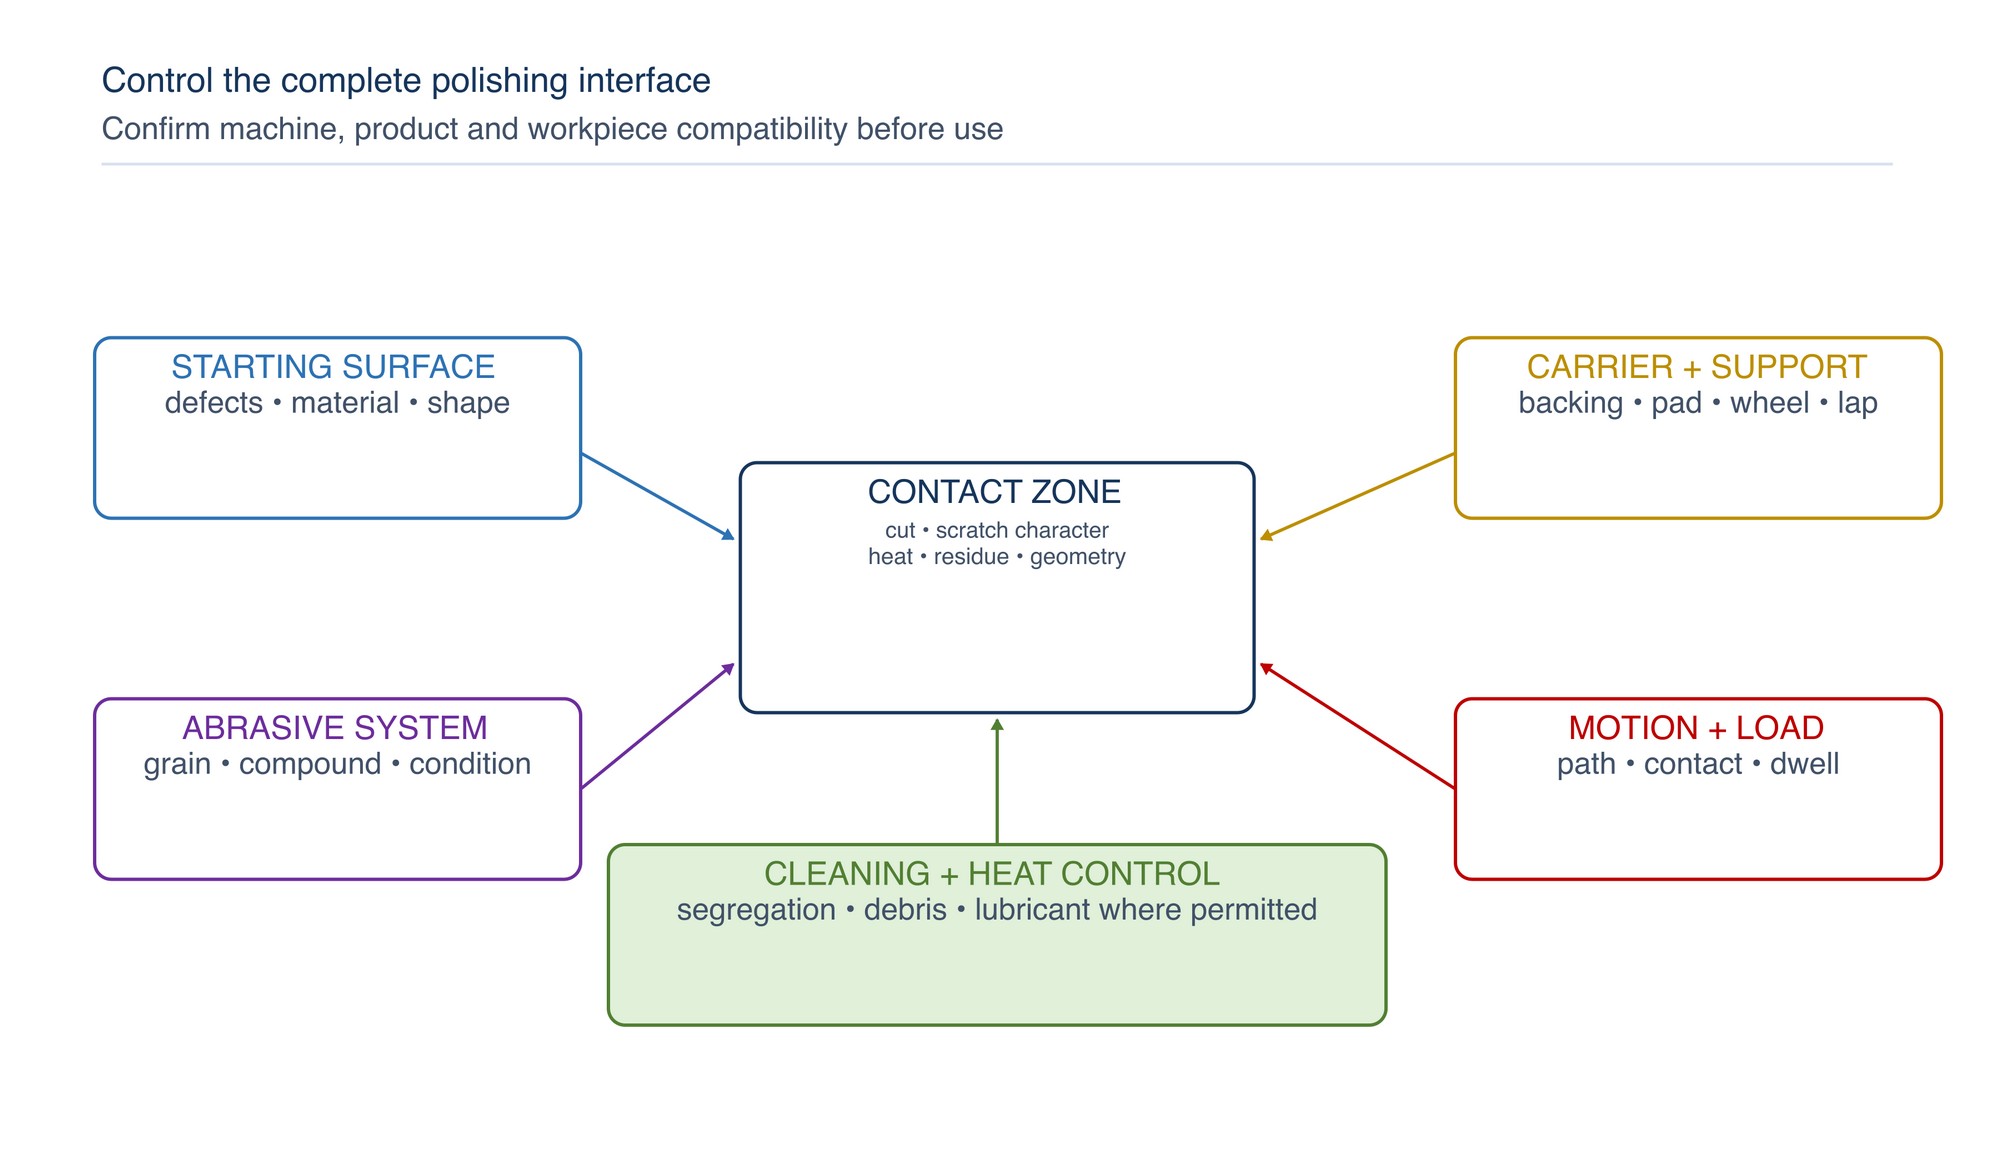
Polishing is governed by the complete contact interface, not by abrasive grade alone.
| Control variable | Practical effect | Control question |
|---|---|---|
| Starting surface | Sets the deepest defect the stage must remove | Is the surface uniform enough for this stage? |
| Abrasive or compound | Governs cut, scratch character, loading and residue | Is the abrasive family compatible with the material and next process? |
| Backing, pad, wheel or lap | Controls support, conformability and local pressure | Will the carrier preserve the required flat, curve, edge or detail? |
| Motion and contact area | Influences lay, dwell, heat and visual uniformity | Is contact stable and moving through a repeatable path? |
| Pressure and exposure time | Affect removal, heat, smearing and geometry loss | Is the stage cutting cleanly without forcing or dwelling? |
| Lubrication or coolant | Can influence heat, loading, swarf transport and cleaning | Is it permitted and compatible with the work and downstream process? |
| Cleanliness and segregation | Prevent isolated scratches and material transfer | Are work, tools, hands and surroundings clean for the current stage? |
| Inspection conditions | Determine which scratches, haze and waves can be seen | Are lighting, viewing, cleaning and reference conditions repeatable? |
Protect flats, curves, edges and details
Use a firm, stable support when flatness and crisp transitions matter. Use conformable products deliberately on tubes, radii and contoured parts, recognising that conformability can increase contact around edges and high points. Match the tool width and contact footprint to the feature so that the operator can see and control the blend.
Approach edges with reduced local dwell and stable support. Do not allow a flexible wheel or pad to wrap unpredictably around a thin edge, opening or projection. Mask or physically protect adjacent finished faces where the process permits. On fabricated assemblies, plan access so that the polishing direction and overlap remain consistent across welds and adjoining surfaces.
Manage heat, loading and material response
Fine abrasive stages can generate damaging heat even when sparks are limited. Heat can soften coatings or polymers, promote smearing in ductile metals, discolour stainless steel, distort thin sections, load the abrasive and shorten wheel or compound life. [S023; S149; S154]
Maintain clean cutting action through appropriate product choice, adequate contact area, progressive movement and timely abrasive replacement. If cut falls while heat rises, stop and inspect for loading, glazing, contamination, insufficient support or an unsuitable stage. Increasing force is rarely the best first correction.
Use wet methods only when the machine, abrasive, workpiece and downstream process permit them. Control splash, electrical hazards, slurry, slip risks and drying. Refer to the product label, Technical Data Sheet, or MKTECH representative.
Prevent contamination between materials and stages
Separate abrasives, wheels, pads, compounds, brushes and cleaning materials where cross-contamination matters, especially between carbon steel and stainless steel or non-ferrous work. Identify tools by material family or process stage and store them so coarse debris cannot fall onto fine-stage products. [S125; S126]
Before every finer stage:
- stop the machine and secure the work;
- remove swarf, spent abrasive and compound from the part;
- clean hands, fixtures, supports and the work area as required;
- inspect the new abrasive or wheel for contamination and damage; and
- confirm that the preceding scratch family has been removed.
Use a cleaner compatible with the substrate and next operation. A glossy film of compound or oil can conceal scratches and interfere with coating, bonding, plating, welding or hygiene requirements.
Inspect appearance and surface condition separately
Inspect a cleaned surface using consistent lighting, distance, angle and viewing direction. Use both diffuse illumination for overall uniformity and low-angle illumination to reveal scratches, waves and local drag marks. Change the viewing orientation because directional defects can disappear when aligned with the light.
Compare appearance with an approved physical reference when colour, sheen or directional character matters. If roughness, flatness or another parameter is specified, use the stated instrument, setup, locations and acceptance rule. Do not accept a part solely because it looks bright.
For compound-based work, make the final appearance judgement after compatible cleaning. Temporary filler or residue can mask scratches that reappear after washing or service.
Troubleshooting polishing defects
| Symptom | Likely process cause | Practical correction |
|---|---|---|
| Deep lines remain after the surface brightens | Previous-stage scratches were not removed; stage jump was too large | Return to the stage that can remove the deepest line, restore a uniform pattern, clean and progress again |
| Random isolated scratches appear | Coarse-particle carry-over, dirty support, contaminated compound or damaged abrasive | Stop, clean and segregate; replace the contaminated item and rework from the required stage |
| Surface becomes hot while cut falls | Abrasive is loaded or glazed; contact is too concentrated; force or dwell is excessive | Stop and inspect; restore clean cutting action, support and movement before resuming |
| Haze or uneven gloss remains | Inconsistent scratch refinement, wheel condition, compound delivery, overlap or cleaning | Standardise the preceding finish and work path; clean and compare under controlled light |
| Ripples or waves appear on a broad face | Flexible contact, repeated local dwell or uneven support altered the surface | Return to a firmer supported stage and re-establish geometry before final polishing |
| Edges become rounded or lettering softens | The carrier wrapped around the feature or contact was concentrated at the edge | Protect the feature and use stable, reduced-area contact with controlled approach and exit |
| Metal smears instead of cutting cleanly | Heat, loading, soft material response or unsuitable abrasive/lubrication | Cool and clean the interface; select a compatible cutting system and reduce concentrated dwell |
| Compound remains in seams or pores | Excess compound, unsuitable carrier or inadequate cleaning access | Reduce application, improve containment and use a compatible cleaning method before release |
| Bright surface still fails functional inspection | Gloss was treated as proof of roughness, cleanliness, flatness or service condition | Test the specified property separately and correct the relevant process stage |
Concise safety reminders
- Inspect the machine, guard, spindle, wheel, pad, belt, attachment and work support before use.
- Confirm that every rotating accessory is intended for the machine and task; never exceed its marked limit.
- Secure the work and keep hands, clothing, hair, jewellery, gloves and loose materials clear of rotating parts and nip points.
- Use extraction or other effective controls for polishing dust, swarf, fibres, mist and compound. Do not direct debris toward the breathing zone. [S152]
- Assess combustible metal dust and mixed-metal residues before collection or disposal.
- Select suitable eye, face, hearing, respiratory, hand, body and foot protection for the complete exposure.
- Control heat, sparks and ignition sources; isolate energy before changing, cleaning, clearing or inspecting equipment.
- Keep wet processes compatible with electrical protection, floor condition, wastewater and slurry controls.
- Follow current Malaysian workplace requirements, site procedures, machine instructions and abrasive-product safety information. [S153; S155]
Practical polishing sequence
- Identify the substrate, starting condition, geometry, defects and downstream service.
- Define the required appearance, lay, texture, geometry, cleanliness and inspection method.
- Establish work support, guarding, extraction, access, segregation and personal protection.
- Remove oil, dirt, scale and loose contamination before abrasive refinement.
- Use grinding only where stock removal or geometry correction requires it.
- Create a uniform supported sanding pattern that removes the grinding damage.
- Clean the part, tool, fixture and work area before each finer stage.
- Progress only after the preceding scratch family is absent under suitable inspection lighting.
- Match backing or wheel conformability to the flat, curve, edge or detail being finished.
- Maintain stable contact and movement; stop if heat, loading, smearing, vibration or loss of control develops.
- Polish to the required scratch refinement; buff only when the specified lustre or final smoothing calls for it.
- Remove compound and process residue with a compatible cleaning method.
- Inspect appearance and specified functional properties as separate requirements.
- Protect the accepted surface from handling marks, moisture, dust and cross-contamination.
Polishing Compounds and Buffing Wheels
The Polishing Compounds and Buffing Wheels chapter begins on the following page of the printed handbook (page 228), outside this chapter extract.